
Scenes Overview
Scenes are the building blocks of your game. They contain the objects of your game and provide an essential way to organize different sections of your game. For example, you may create a scene for the initial menu for the game, another for an individual game level, another to end the game, etc. You can use scenes to design and build your game in segments.
Scenes are containers for the objects (called “actors”) in your game. You can split each scene into layers (similar to many design programs, such as Photoshop or Illustrator). Layers provide another level of (visual) organization for your game, and they allow you to group objects within your scene and arrange them in front of or behind other layers/objects. For example, one layer may contain your background, another may contain all your labels, another may be for actors in your scene that the player can interact with, etc. To view or edit the scenes within your game, select the “scenes” button within your navigation menu.
![]()
To add a new scene, press the Home button and then press the ‘+’ button in the bottom left of the interface. To copy an existing scene, hold down the ‘option’ (aka “alt”) key and drag a copy of the existing scene to the desired location within the scene list. To delete a scene, simply click it and press “Delete”, or the “-” button in the bottom left of the interface.
Scene Attributes
The following attributes define each scene and are modifiable:
- Name: a descriptive way for you to refer to different scenes within your game.
- Time: the number of seconds a scene has been active. This attribute can be read and incorporated into your rules/behaviors, but not set.
- Size: the pixel dimensions (width and height) of the current scene.
- Wrap X: when enabled, actors that exit the left side of the scene will re-enter from the right side of the scene (and vice versa). When disabled, actors continue moving indefinitely off-screen unless they are explicitly destroyed (via behaviors you’ve set).
- Wrap Y: similar to “wrap x” but in the up/down direction. when enabled, actors that exit the top of the scene will re-enter from the bottom of the scene (and vice versa). when disabled, actors continue moving indefinitely off -screen unless explicitly destroyed (via behaviors you’ve set).
- Gravity: the strength of gravity in the scene. The default value is 0. Using a value between 100 and 1000 will provide approximately “normal” gravity. We caution against using any values significantly above 10,000. Please note that gravity can be directed in both the X and Y directions; negative values will cause items to go in the opposite direction. Gravity affects all movable objects in the scene.
- Color: the background color of the scene, represented via red, green, blue, and alpha integer values between 0 and 1. You can edit any of these individual values, or you can select a color from a color picker.
- Camera: compound attribute with the following sub-categories:
- Origin: the starting x and y position of the lower left corner of the camera relative to the scene.
- Size: this sets the width and height describing how much of the scene will be shown when the game is played. These values are set depending on the resolution selected in the Project Editor and cannot be modified manually. To adjust a scene size, click the “home” button, select the “Project Info” tab, and use the drop-down “Platform” menu. Selecting any of these options will automatically resize all of the scenes in the game to match that platform’s screen size.
- Tracking area: you can give actors within your scene a “Control Camera” behavior which ensures that the camera will follow the actor as they move through a scene. This tracking area sets the boundaries (width and height) for when to begin scrolling a scene (if possible) based on the position of an actor with the Control Camera behavior. The camera will snap to the actor with that behavior unless it would force the camera to move beyond the edge of a scene.
- Rotation: the rotation of the camera which changes based on auto-rotation. This cannot be modified manually.
- Auto-rotate: rotates the scene to adapt to a player turning their device. For example, if a player turns their device upside down, you may want the game to autorotate to portrait (or landscape) upside-down to adjust to this new view. In contrast, if you are creating a maze or tilt game, you would not want the scene to rotate as the player tilts the device to navigate the ball (or whatever object) around the maze.
As we’ll discuss in more detail later, attributes are the values (numeric or text) relating to an object that are easily and rapidly changed at any point. For instance, the positioning of the camera in a scene can be changed by altering the “camera origin” attributes, while the background color of the scene is alterable with the “color” attribute.
Several key behaviors affect which scene is currently active in your game. The foremost of these is the “Change Scene” behavior.
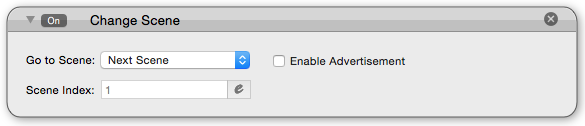
Select any scene in your game from the drop-down menu in this behavior. Generally, you’ll want this behavior in a rule stating some sort of precondition for changing the scene, such as an actor reaching a goal, or achieving a certain score. When this behavior triggers, it’ll change the focus of the game to the selected scene, and reset the scene you were just in. You can also use “Change Scene” to return to a previous scene.
The Pause Game behavior functions similarly, but also has a few key differences. Instead of resetting the “current” scene, it simply pauses everything in it, and opens the selected scene.

Use the “Unpause Game” behavior in the scene you selected in the “Pause Game” behavior to return to the original scene. Typically, you’ll want to place this behavior in a rule stating that a button (“Unpause” or “Resume Game”) has been pressed, or something similar.

Finally, we have the “Reset Scene” and “Reset Game” behaviors. The former will reset just the current scene and that scene’s attributes, while the latter will reset all scenes and attributes in the game.
 One final element of the Scenes Editor that it’s useful to be aware of is the Camera controls.

By clicking the camera image, we can adjust the camera zone. The camera zone is the movement leeway an actor has before causing the camera to move. In other words, say we have an actor that controls the camera’s movement. Generally, as the actor moved through the scene, the camera would follow. But say the actor turned around and headed in the opposite direction – we would want it to move a small distance before the camera started to follow. That distance is the movement leeway – controlled with the camera zone. Use the handles to reduce or increase this margin; basically the actor controlling the camera will be able to move freely in the central black area before bumping into the camera zone and moving the camera along with the actor.
To return to scene editing mode, simply click the arrow to the left of the camera image.