
Amazon Developer Console
This section assumes you will be uploading a new application to Amazon. This also assumes you have your tax identity (see https://developer.amazon.com/taxinterview/tax_guide.html) and payment information have been submitted and accepted by Amazon.
If you are updating an existing app that’s already on Amazon, you can skip to step 4. The purpose of this section is to get as much done in the Developer Console as possible before publishing to remove the need to re-upload your APK for testing purposes.
1. Log into the Amazon Developer Console
Go to https://developer.amazon.com/admin to log into the Amazon Developer Console using the developer account you use to publish apps. If you do not have a developer account, go to https://developer.amazon.com/registration/profile.html to register a free account.

2. Add a New App
Click on ‘Add a New App’ and select ‘Android’ and press ‘Next’. Alternatively you can press the down arrow next to the ‘Add a New App’ button and select ‘Android’ from the drop down menu.


3. Enter App Details
Complete the fields for the new app, and press ‘Save’. These fields can be modified later. Once submission is done, Amazon will create an Application Key for your app that will be available in the General Information tab for the selected app. This Application Key will be used in Step 13.

4. Add In-App Items Tab
Click on the “In-App Items(#)” tab to add in-app items. From here you can add Consumable items, or Entitlement items. In GameSalad terms, the Entitlement items are non-consumables. GameSalad does not currently support Subscription items.

5. Selecting and Creating an Item Type
When you click on the ‘Add a Consumable’ button or ‘Add an Entitlement’ button, a new form will appear. Fill in the ‘Title’ and ‘SKU’ and press the ‘Save’ button. You will get new tabs that will require completion. Note: The ‘Type’ will differ depending on which type of item you are adding.

6. Setting the Price of an In-App Item
In the ‘Availability & Pricing’ tab, select if you are charging for the consumable, and if so, set the base price and the currency type. You may set your own price depending on marketplace, or have it calculate the list price automatically. Press ‘Save’ when finished.

7. Adding a Description of an In-App Item
In the ‘Description’ tab, add a description and keywords. You can add additional translations if you like. Otherwise, the default description will be used. Press ‘Save’ when complete.

8. Adding Images for the In-App Item
In the ‘Images’ tab, add a 114×114 small icon and a 512×512 large icon in .png format for the item. Press the ‘Save’ button when complete.

9. Submit In-App Items
Once steps 5-8 are complete, you can Submit the In-App Item or go to step 10 to test the In-App Items. Testing is always recommended, but it is not mandatory.
Press the ‘Submit In-App Item’ when all the fields in the tabs for the item are complete.
![]()
Note: If you do not have your payment and tax information completed with Amazon, you may get an error message that will not let you complete app submission.

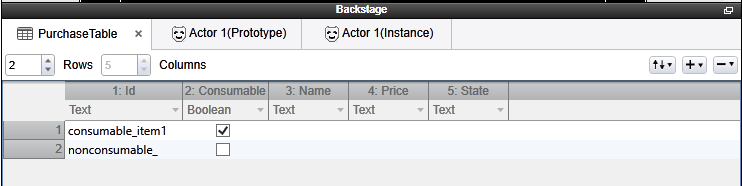
10. Verify All Instances of In-App Item IDs
In the “PurchaseTable” table in your project, make sure each In-App Item added in Step 5, has a corresponding row, and that the ‘Id’ and ‘Consumable’ columns are filled to match what was submitted to the Amazon Developer Portal. Also make sure all behaviors that use those in-app items IDs have the same values.
11. Send the Project to the GameSalad Publishing Portal
Once all Item IDs are verified, press the Publish button in GameSalad to send the project to the GameSalad publishing servers. Select an existing game to update or create a new one.
12. Update Fields in the GameSalad Publishing Portal
Aside from normal GameSalad project publishing, to publish a game to Amazon with In-App Items, there are a few extra fields that need to be updated. From Step 3, the Application Key created in the Amazon Developer Console, must be added to the Services->Amazon section of the Publishing Portal. Add that key in both the Android API Key and Kindle API Key sections.


If this API Key is not included, you will have this error:

13. Generate and Sign APK
Press the ‘Generate APK’ button and when the APK has been created, press the ‘Sign APK’ button to download the APK. Follow the normal publishing steps and install the newly created and signed APK onto your test device.

Testing In-App Items
You can test your In-App Items before you submit your app to the Amazon store.
14. Create and Load JSON File
Once all the IAP data for all items available for purchase has been entered you are ready to generate the JSON file. In the My Apps>”App”>In-App Items section there is a JSON Data File button, select that to generate the file and initiate the download.

The JSON data file must be pushed onto the target device in order to properly test IAP test data. Open the Terminal and enter the following command and press the ENTER key:
adb push /mnt/sdcard <drag the JSON file here in the terminal> /mnt/sdcard/amazon.sdktester.json
15. Downloading and Installing the Amazon Test Client SDK
The final step you will need to do is to make sure that the Amazon testing app is installed on the target device. This can be downloaded from the Amazon AppStore.
The Amazon AppStore app is available on Kindle devices, but for Android devices, it must be installed first. See http://www.amazon.com/gp/mas/get-appstore/android to install on Android devices.
Now you are ready to test. Launch the App with the IAP you want to test, and you should see a popup when you try to buy an item in the App.
16. Testing In-App Item
Once steps 5-8,10-15 have been completed, you are ready to test the IAP data using the Amazon test setup. Launch the target App and select an IAP item to purchase. You should get a window with the IAP items information and selecting the Buy button should result in a successful IAP. Make sure to check LogCat to verify that the purchase was successful. If the IAP test fails LogCat will also provide you will information you can use to troubleshoot the issue.